Display Control Panel
Reset Image
Returns the image to the original orientation (top/bottom (rotation) and left/right (flip)).
Display Just Image Data / Image & Dummy Data
Use these two radio buttons to select which set of data to display on the screen. Refer to “Frame Control Settings” for more information on capturing reference data.
Three Windows / Single Window
If you captured only a low gain image (entered a value for the LDR Gain), it is displayed in the Main Image panel and its corresponding histogram is displayed in the Histogram panel.
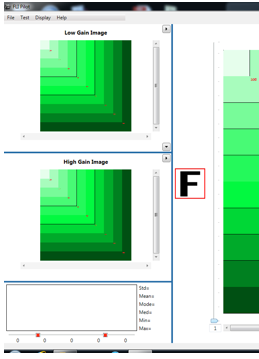
If you set two different gains, you will obtain and can view the Low Gain, High Gain and the merged High Dynamic Range (HDR) images. The default image in the Main Image panel is the High Dynamic Range image with the Low Gain image in the Top Image panel and the High Gain image in the Bottom Image panel. This default with three images in the three Image panels and the histogram in the Histogram Panel is referred to as the Three Windows layout. You can change which image is displayed in which Panel using the arrowheads in the panel borders as described earlier. The displayed histogram corresponds to the image in the Main Image Panel.
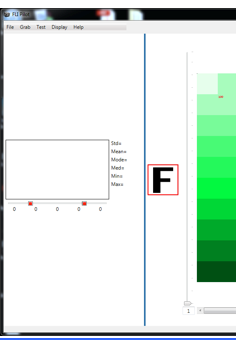
You can change the display so only a single image (Low Gain, High Gain or the merged High Dynamic Range (HDR) Image) appears in the Main Image panel and its corresponding histogram is displayed. This layout is referred to as the Single Window layout. Change the layout using the Single Window (Figure 4) or Three Windows (Figure 5) radio buttons located on the Image Display Control panel.


Rotate Images
You can rotate all three images (High Gain, Low Gain and High Dynamic Range) in 90° increments together. Rotate the images using the Display Control Panel’s Rotate Image button. The current rotation is displayed to the right of the Rotate Image button and represented by the orientation device. Click Reset Image to return the image to its original orientation.
Flip Image Left To Right, Flip Top To Bottom
You can flip all the images (High Gain, Low Gain and High Dynamic Range) together horizontally and vertically. Use the checkboxes on the Image Display Control to rotate the images. The current rotation is represented by the orientation device (F). Examples of this can be seen in Figure 2 & 3. Deselect the selected checkbox or click Reset Image button to return the image to the original orientation.

Finger Lakes Instrumentation
200 Tech Park Drive
Rochester NY 14623 USA
200 Tech Park Drive
Rochester NY 14623 USA
Phone: 585-624-3760
Email: sales@flicamera.com
Web: https://flicamera.com
Email: sales@flicamera.com
Web: https://flicamera.com
©2024 Finger Lakes Instrumentation
Figure 1. Display Control
Figure 2. Image Orientation (Rotated)
Figure 3. Image Orientation (Flipped)
Figure 4. Single Window Mode
Figure 5. Three Window Mode
