Manual Flat Field Correction
Generating a Master Flat Frame
1. Capture an image with the intended settings, exposure, and
camera configuration you intend for the final image.
2. Generate a master dark frame for the configuration desired.
Reference Fixed Pattern Noise Correction for information on how to
do so.
3. Apply the fixed pattern noise correction to the image initially taken
and take note of the mean pixel value.
4. Ready your camera for a flat field capture.
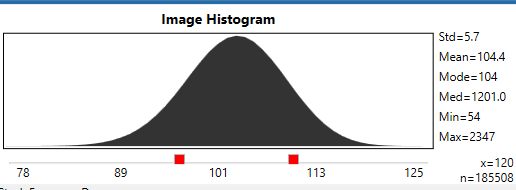
5. Capture a flat field image whose mean pixel value is equal to the
mean pixel value of the FPN corrected initial image. This is achieved
by adjusting the exposure time. The mean pixel value is shown with
the Histogram (Figure x)
6. Generate a master flat frame with the exposure time discovered in
the prior step.
7. Save the master flat frame with File ⟶ Save As …


Finger Lakes Instrumentation
200 Tech Park Drive
Rochester NY 14623 USA
200 Tech Park Drive
Rochester NY 14623 USA
Phone: 585-624-3760
Email: sales@flicamera.com
Web: https://flicamera.com
Email: sales@flicamera.com
Web: https://flicamera.com
©2024 Finger Lakes Instrumentation
Figure 1: Uncorrected Image
Figure 2: Flat Field Corrected Image
Apply Flat Field Correction
1. Enter the Flat Field Correction menu of Tester Routines.
(Figure x)
2. Use Browse to select a Low Flat File and High Flat File. These
will be the images previously saved as a result of the Master Flat
Frame Generation.
3. Select a Low Target File and a High Target File, which will be
the low and high gain images of the image you wish to apply flat
field correction to.
4. Select Start to generate the final image, which can then be
saved.
Note:
These aspects of imaging must remain
constant between master flat and final image:
• Gain
• Lens
• Mean Pixel Value
Flat field correction is a type of post process correction that uses a reference flat frame to correct for lighting discontinuity in an image. The process uses a master flat frame to scale up or down the brightness of individual pixels to make the brightness of the final image balanced.
Notice in Figure 1 and Figure 2 that Figure 2 shows noticeably more even brightness, and damage to the lens has been corrected.
The process of applying a flat field correction is not difficult, however it requires an understanding of what it is capable of doing. A master flat frame is similar to the pickiness of a master dark frame, in that the master frame needs to be taken with continuity between its capture and the capture of the image to be corrected.
